
Guest reading progress stays in this browser and is not synchronized to your account automatically. Use the learning panel to include browser marks and save them explicitly. Clearing site data removes browser marks.
Your learning notebook
Save courses and review situations deliberately. Load your account records on another device when you want to continue.
Bookmarks and review choices stay in this browser until you load and save an account. Answers and time spent reading are not recorded.
Saved courses
Saved situations to revisit
Find your marked situations by title or topic, then open the original question and explanation.
Your review choices will appear here when this learning view is ready. Use the account controls above to load account choices.
No situations are marked for review in this learning view.
No saved situation matches these filters. Clear the search or choose all topics.
Identification practice
Land access practice
Field decisions practice
Harvest care practice
Useful reading before this lesson
Start with these guides for background and preparation. You can open any guide at any time.
Watch the narrated field lesson · English narration · subtitles in four languages ↓
Brief the outing · Snow Goose
A small team rehearsing a manageable dry-field Goose setup after access and hunt requirements have been checked.
An original planning summary to use with the full lesson. Check current law, permission, identification and local conditions separately; this card does not establish readiness or eligibility.
Open the briefing and field checks
Three tools and their jobs
- Numbered decoy bags: divide carrying work and count everything back in.
- Wind indicator and notebook: record actual conditions before rearranging equipment.
- Repair pouch: secure loose stakes and keep broken pieces out of the field.
Rehearse the complete visit
- Before leaving: At home, assign each bag to a person and choose a setup small enough to remove if ground or wind deteriorates.
- On arrival: At the agreed entrance, compare field trafficability and wind with the plan; keep the vehicle on the permitted approach.
- Brief and organise: Brief the whole team on people, retrieval boundaries and the clear return corridor before placing equipment.
- Return and review: Count bags, loose stakes and waste against the starting inventory; note the single change you would test next visit.
Two avoidable mistakes
- Adding more decoys before checking wind, disturbance and visibility makes the cause harder to diagnose.
- Splitting the team across the field without a common regroup point can delay the return.
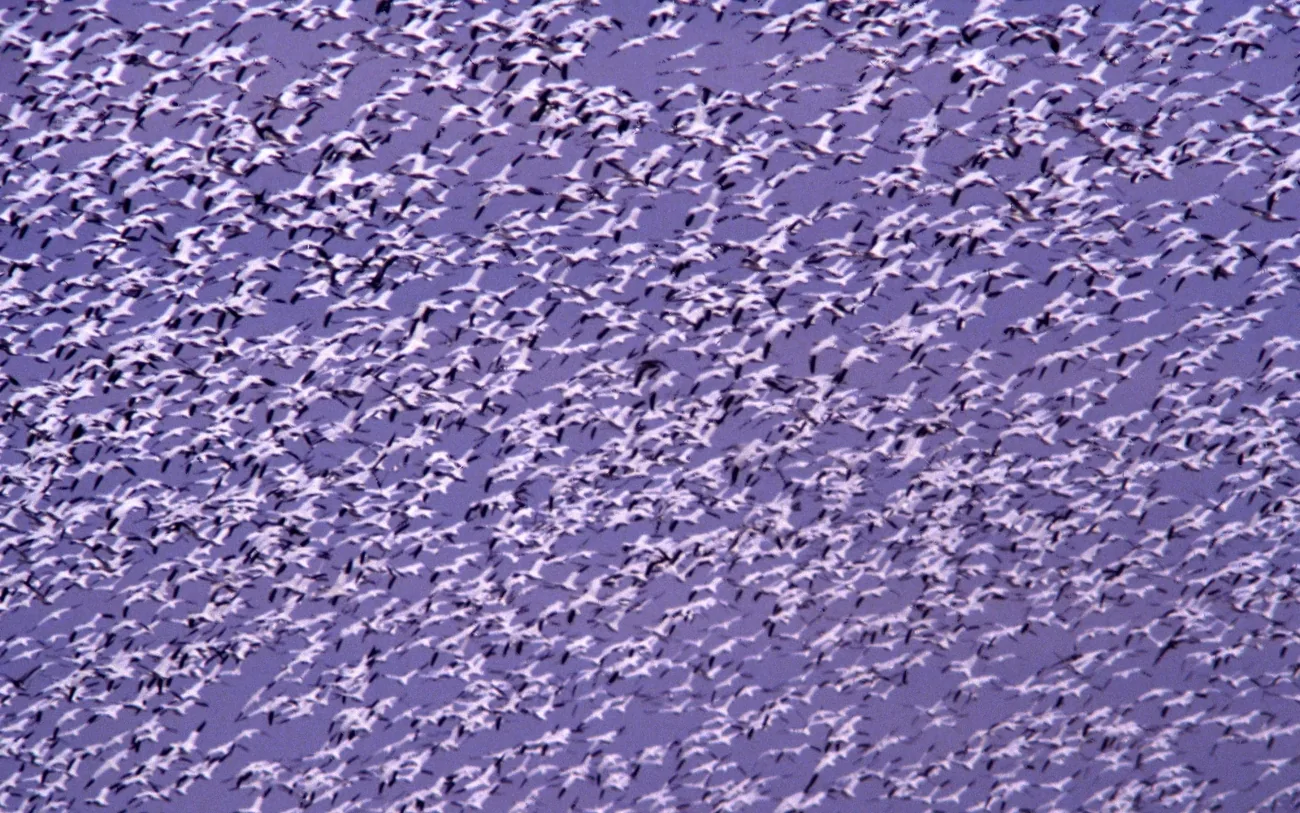
Representative photograph from the credited source, taken outside Saskatchewan. It is not a current sighting, a distribution map or a complete identification guide.
Image credit: USFWS · Public Domain · View image sourceWhat you will learn
- Choose a workable hide and landing area from current bird use, wind and the limits of your permission.
- Match decoys, transport and calling options to the conditions and the people available.
- Use a repeatable observation–check–change process and finish with a complete recovery and cleanup.
An original SKHunter learning guide
The field is the starting point; the decoys are a tool
This lesson starts after your access, qualifications and general preparation are in place. It covers a permitted, harvested dry field, not a boat, a marsh crossing or a hunt on a roost. On arrival you still have to decide whether today’s ground, wind, visibility and recovery route make that particular setup workable.
Snow Goose equipment can become bulky quickly. Make three decisions before unloading: where birds have actually been using the field, where you can hide without damaging it, and how you will recover birds within permitted ground. If those answers do not fit together, choose another approved position or observe instead of forcing a setup.
Choose a scale you can deploy and recover well
Windsocks are compact decoys whose bodies respond to air movement. Full-body decoys keep a three-dimensional shape; shell decoys are partial bodies that pack more compactly; silhouettes are flat profiles that need varied viewing angles. Each trades carrying space, setup work and behaviour in the wind. Inspect your actual equipment rather than assuming one style works in every condition.
A portable example might begin with about ten dozen socks, borrowed or shared if useful. That is a published small-spread example, not a minimum or a shopping requirement. A smaller realistic group on a well-observed feed, or a larger team-owned spread, is another approach. Your capacity to hide, transport, monitor and pick up every item matters more than copying a photograph’s count.
Treat each adjustment as a small field experiment
A rejected approach is information, not a diagnosis. Log the approach side, turn point, wind and what people or equipment were doing. Several similar responses are more informative than one flock. Check the location and hide before assuming more calling, more motion or more decoys will solve the problem.
Change one thing during a safe pause, then observe again. A different hide outline, an opened pocket and a reduced call volume are three separate changes; doing them together prevents you learning which mattered. Wind shifts, poor identification, an uncertain recovery route or a person outside the agreed position can require stopping rather than experimenting.
Intermediate fieldcraftAfter permission · dry harvested fields
Use this sequence for a decoy hunt in an already approved dry field. The layout is an explanation of relationships, not a scale plan or a declaration of a safe shooting distance. Begin with lawful equipment and only appropriately permitted people in hunting roles, including calling, decoy work and retrieval.
Choose a workable kit
| Item | Priority | What it does | Practical choice / alternative |
|---|---|---|---|
| Binoculars, offline map and a short field notebook | Core kit | Confirm current field use, permission boundaries, entry and recovery routes without walking through the birds. | A printed map and pencil back up the phone; observe from the agreed access point. |
| Wind indicator and current weather information | Core kit | Compare ground-level wind with the forecast and reassess visibility and the return journey. | A securely attached short ribbon is enough to show direction; collect it at the end. |
| Lawful hunting equipment, eye and hearing protection | Core kit | Use equipment already checked and practised with. Establish safe transport, handling and a personal effective limit before the outing. | Resolve equipment or handling doubts with a qualified instructor; this lesson does not prescribe loads or replace practical training. |
| Low-profile hide and ground insulation | Core kit | Break up the human outline while keeping the observer dry, warm and able to remain still. | Borrow a suitable hide or use an authorised natural-cover position; do not cut vegetation or dig without permission. |
| Snow Goose decoys suited to today’s wind | Core kit | Represent a believable group while leaving an arrival pocket. Socks save carrying space; stable bodies may suit conditions where socks collapse or whip. | Borrow or share a manageable spread. Begin with what the team can deploy and recover; no universal count is required. |
| Stakes, grouped carry bags and basic repair spares | Core kit | Keep the spread secure and make lost stakes or damaged decoys easy to identify during collection. | Reduce the spread if the ground cannot hold the supplied stakes; do not improvise unstable flying objects. |
| Manual call; electronic caller only if expressly permitted | Optional | Use sound as a controlled option after checking current Saskatchewan species, season and recording conditions. | Use a lawful manual call or remain quiet. An unverified electronic-caller setting stays switched off. |
| Simple hand flag or other lawful motion option | Optional | Offer a small amount of movement when observation suggests it helps, with one designated operator. | Natural decoy movement may be enough; remove an option that produces an unnatural distraction or exposes the person. |
| Weather layers, headlamp, water and first-aid supplies | Core kit | Support safe setup, a still wait and a deliberate return; include spare light power and a way to communicate. | Shorten or cancel the session if weather, communications or physical comfort cannot be managed. |
| Recovery plan, gloves, cooling supplies and waste bags | Core kit | Plan access for every likely fall area, hygienic handling, cooling and complete collection of shells, stakes and rubbish. | Use a trained retriever with an appropriately permitted handler when suitable; a dog does not replace permission or justify unsafe water access. |
Compare the equipment forms
Look at body shape, support and carrying volume before choosing a manageable combination. A decoy represents a bird; it does not replace the site observation or the open landing space.
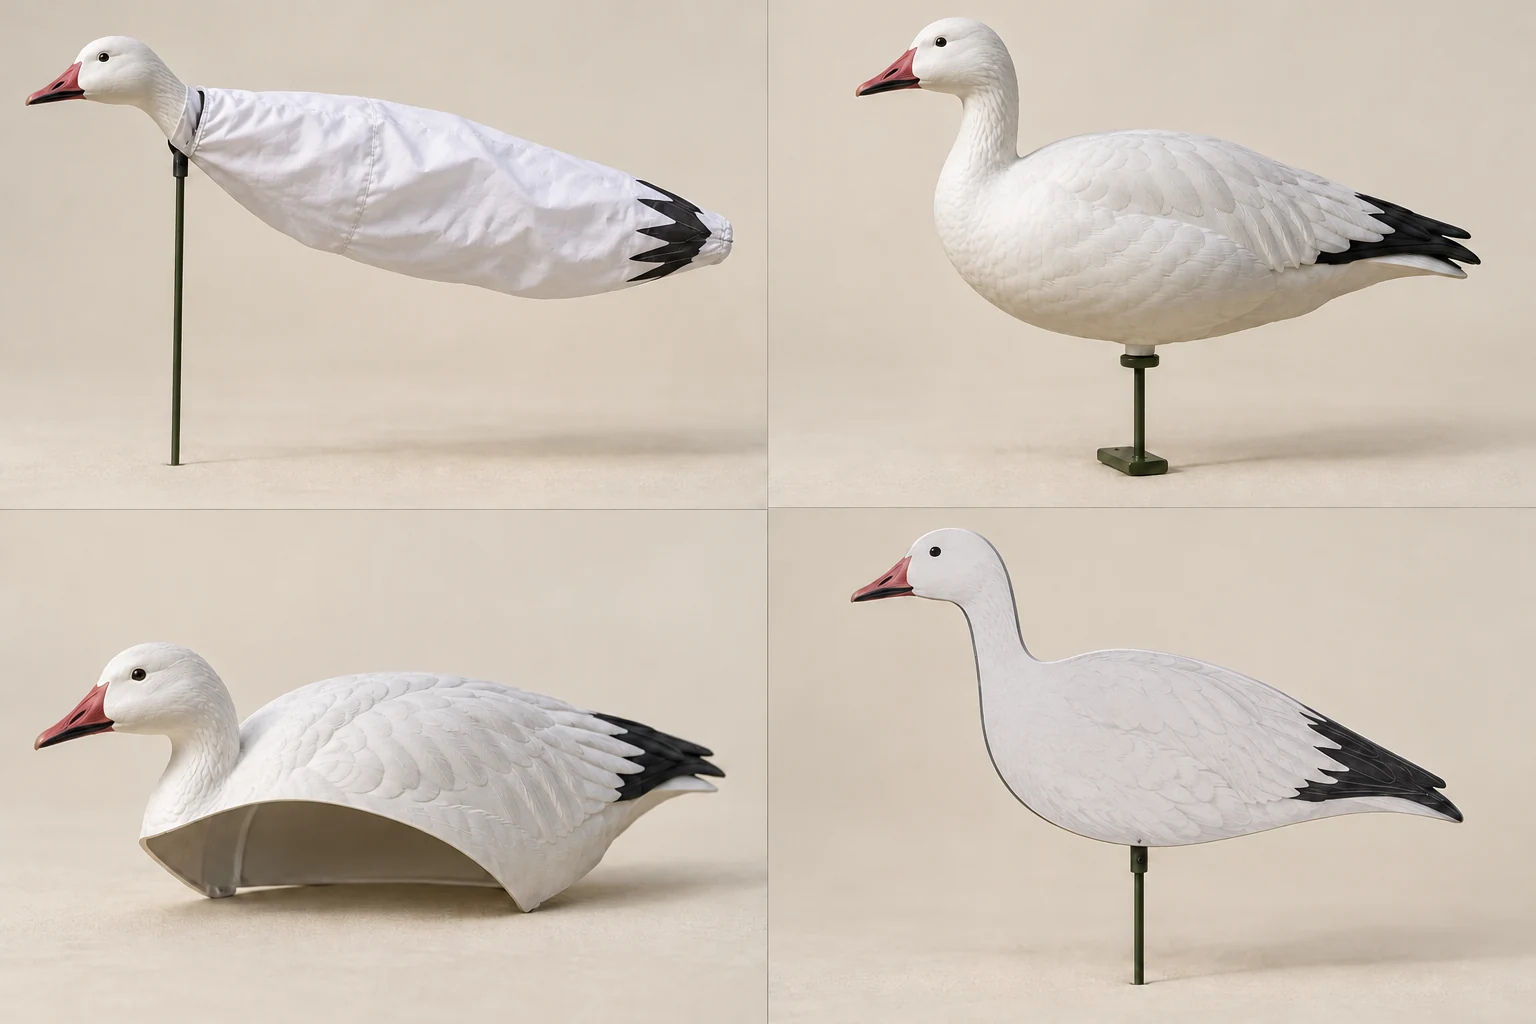
Windsock on a stake
The fabric body opens in usable wind and can add gentle movement. It packs into less space, but needs a suitable support and enough wind to show its intended form. Check the actual sock for collapse, tangles or hard flapping before keeping it in the spread.
Full-body Snow Goose decoy
A rigid three-dimensional body keeps its shape without relying on cloth inflation. It takes more transport and storage space than a flat or fabric example. Use its body form and pose where they fit the birds you observed, rather than filling every opening with it.
Shell Snow Goose decoy
A low half-body shell can suggest a resting or feeding posture. Stackable models can reduce carrying bulk, while their attachment and support vary by design. Check stability on the actual ground and keep the planned arrival opening clear.
Flat Snow Goose silhouette
A flat printed profile is compact to carry and needs a compatible stake. Its apparent width changes sharply with the viewing angle. Vary orientations and inspect the spread from a permitted approach side while the group is safely paused.
SKHunter · AI-generated teaching illustration · Teaching illustration · not to scale · no distances implied
View the larger illustration ↗These examples explain forms and functions. Choose equipment around the actual field, permission conditions and what your group can carry and retrieve.
Read the field layout
Symbols show relationships, not a required decoy count.
- Decoys: vary small groups and density to match observed birds.
- Landing space: leave an open entrance and usable room.
- Hide: this side position is an example; actual cover and safe directions decide.
- Likely approach: an observation to check, not a promised flight path.
- Wind arrows show relationships only: approaching birds commonly face into the wind, while a crosswind can change which side offers a workable pocket.
- A tapered feeding group is one option, not a compulsory geometric pattern. Cover, current bird use and safe recovery can justify a different approved arrangement.
- The diagram does not define distances, shooting sectors, legal boundaries or permission to place a person anywhere. Confirm those on the actual site.
From arrival to pack-out
Reconfirm the entry and the stopping conditions
At the agreed entrance, decide whether the permitted route and the ground are still usable before unloading.
- Keep to the track, gate, vehicle and crop conditions agreed with the landholder; a muddy shortcut needs its own approval.
- Confirm the people taking hunting roles are appropriately permitted, including helpers who call, set decoys or retrieve.
- Choose a finish time with room for recovery, cooling and equipment collection; make worsening visibility or an unsafe exit a stop condition.
Observe the field before crossing it
Use optics from an approved position to locate the actual feeding area and note how birds approach it.
- Mark a specific portion of the field, not just a pin at the field centre. Yesterday’s observation is a lead, not proof of today’s use.
- Note the approach side, landing area, feeding movement and any farm activity that changes the usable space.
- Avoid walking into a resting flock to test a position. If there is no convincing field use, spend the session observing rather than continually adding equipment.
Draw the pocket before drawing the spread
Identify an open arrival area, the hide and the no-go areas together, using the present wind rather than the forecast alone.
- Birds commonly approach into the wind; a wind-at-back or suitable crosswind arrangement can help, but cover and safe directions take priority.
- Mark roads, buildings, stock, other people and permission edges as constraints. Keep likely recovery areas within ground you may enter.
- Check distances against your own demonstrated ability and local restrictions; the diagram supplies no universal safe range.
Build the hide first
Settle the human positions and camouflage before distributing the decoys.
- Use the permitted cover and match its colour and texture; reduce a sharp roofline or exposed light-coloured bag.
- Keep positions in a clearly understood arrangement. Do not spread people through the field solely because a photograph shows it.
- Check that each person can see the agreed area without repeatedly sitting up; place the dog in a controlled position clear of other activity.
- Inspect the hide from the likely bird approach while the hunt is paused and all equipment is safe.
Recognise the tools. Understand the setup. See what changes when the hide blends in
Compare the same unoccupied hide from the same direction. Inspect its outline, fabric contrast, opening and loose equipment before working on the decoy pattern.
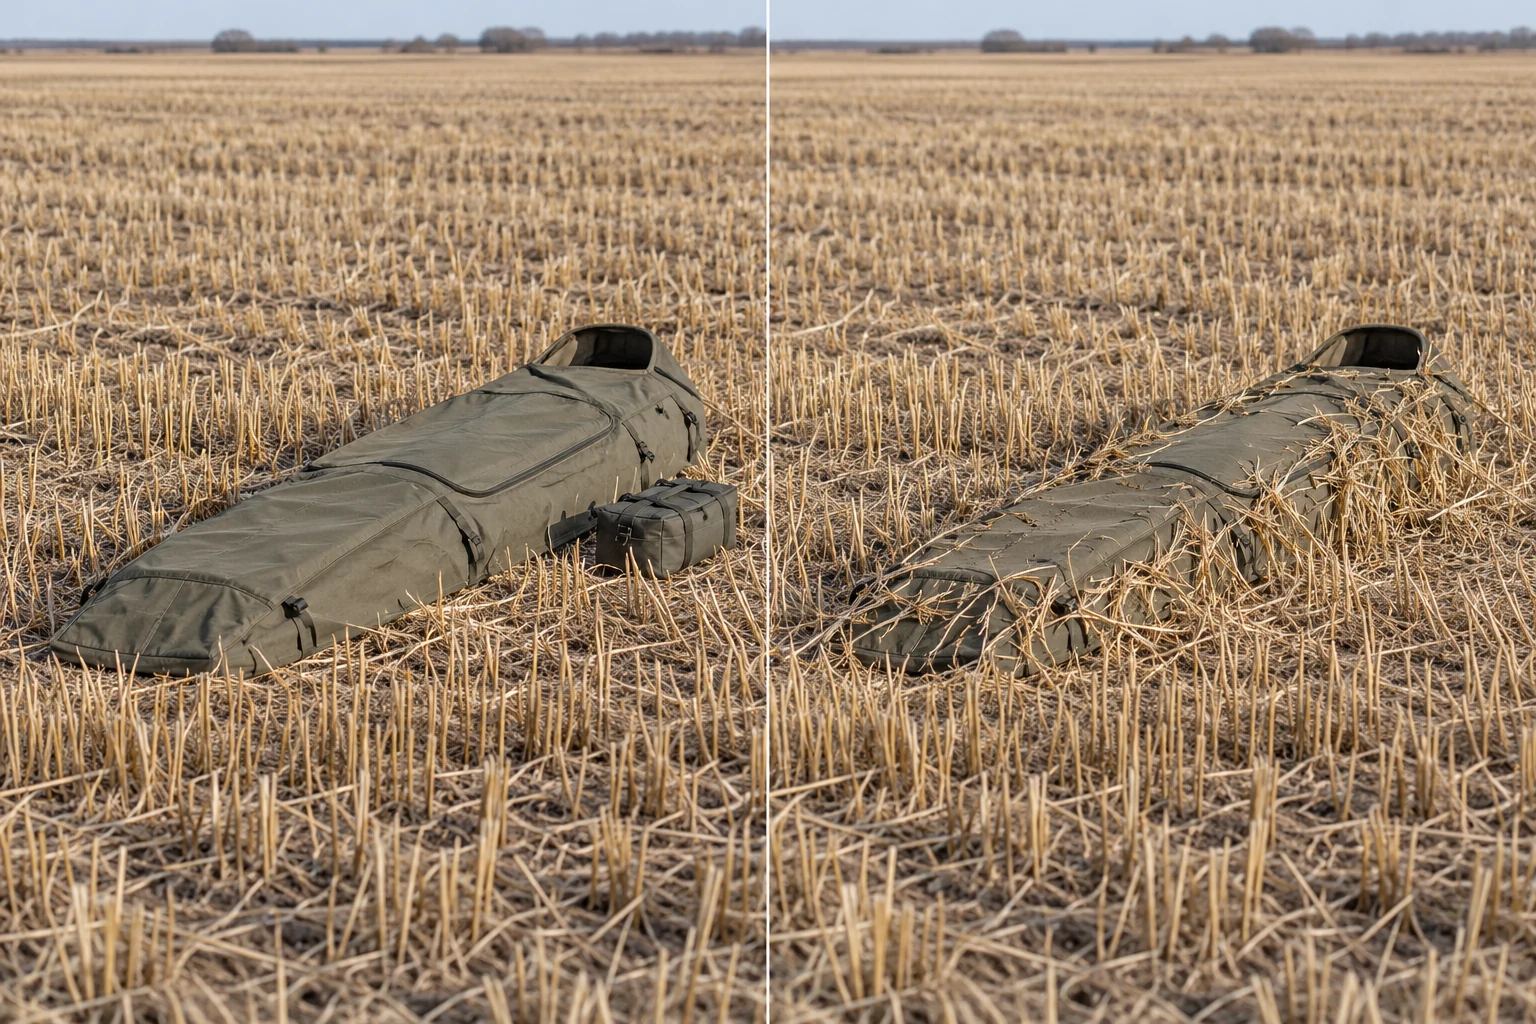
Before: visible outline and loose equipment
The smooth fabric, raised edge, dark opening and bag give you several contrasts to inspect. Their visibility depends on light, background and the direction from which birds approach. Use this as a checklist of things to examine, without treating one feature as proof of why a flock turned away.
After: matching texture with a clear opening
Sparse matching stubble breaks up the surface and outline while the loose bag has been removed. Use only materials permitted by the land-access conditions and keep observation and equipment access clear. Recheck the result from the likely approach side during a safe group pause, especially when the light changes.
SKHunter · AI-generated teaching illustration · Teaching illustration · not to scale · no distances implied
View the larger illustration ↗Build the decoys outward from the intended pocket
Create a loose, irregular feeding impression with a more substantial upwind area and a lighter downwind extension; keep the pocket open.
- Place small clusters and gaps rather than identical rows. Vary the direction of flat profiles so one viewing angle does not make the whole spread disappear.
- Do not put spare bags, unused decoys or people in the pocket. Consider where birds might choose an outside edge, not only where you hope they land.
- Keep the scale manageable. More units create more staking, inspection and pickup work, not a guarantee that birds will finish.
Test the equipment in the real wind
Watch the whole spread for a few moments before settling in, including the far side rather than just the nearest decoy.
- Check that socks inflate and turn freely; clear tangles or remove collapsed units that cannot behave naturally.
- In hard wind, look for snapping fabric, flapping noise or loose stakes. Stabilise or remove the problem and favour a steadier decoy style if available.
- In little or no wind, do not assume motion will appear later. Use a stable-looking arrangement or a lawful, controllable alternative instead.
- Cover or remove obvious reflective equipment and inspect decoys again if frost or changing light makes their appearance different.
Brief the team and begin deliberately
Agree on communication, lawful start conditions and the response to a person, dog or farm vehicle entering the area.
- Name the coordinator and a clear stop word. Everyone must understand positions, safe directions and who will announce a pause.
- Give calling or flagging to one operator initially. If an electronic caller has not passed the local rule check, it remains off.
- Reduce unnecessary movement as birds approach; equipment changes and retrieval happen during a coordinated pause, not beside continuing shooting.
Read the response and make one change
After comparable approaches, use the observation table to select a check before making an adjustment.
- Write down where birds turn or settle, the wind, the hide activity and the sound or motion being used.
- Pause before anyone moves. Change one feature—such as a blocked pocket—then compare subsequent approaches with the same calling plan.
- If the wind turns substantially, reassess the full arrangement and recovery access. Do not swing the layout into an unsafe or unpermitted direction.
Recover, cool, count and leave the field clean
Finish with people and equipment accounted for, a lawful recovery process and enough time to inspect the site.
- Coordinate recovery while everyone else has stopped; do not cross a boundary or enter dangerous water to follow a bird.
- Use appropriate handling and cooling supplies and follow current identification and transport requirements provided in the local rules.
- Count decoys and stakes back into their groups, then walk the permitted work area for shells, rubbish and missed small parts.
- Restore the agreed gate position and send the landholder an agreed brief update; record one useful change for the next outing.
If the birds do not respond
Observe → change one thing → observe again
One adjustment, shown step by step
After pausing the group, check whether loose decoys are closing the entrance. This is one possible cause to test, not a diagnosis of every bird that turns away.
Before · the entrance is crowded
The highlighted decoys occupy the approach to the landing pocket. Check the whole pocket from a lawful observation position.
After · open a continuous entrance
Move only those decoys to the outer groups. Keep the hide and other factors unchanged while observing the next comparable approaches.
Orange shows the decoys being checked and moved. The hide stays in the same position.
Pause and make equipment safe before anyone changes position. Teaching example · not to scale · no prescribed shooting distance
| What you observe | Check first | Make one change |
|---|---|---|
| Flocks ignore the setup from well away. | Are birds actually using this feed and approach route today? | Return to observation or an approved alternative position before adding noise or a larger spread. |
| Approaching birds repeatedly turn away near the same point. | Look for visible people, a sharp hide outline, glare or unnatural equipment movement. | During a safe pause, correct one conspicuous feature and keep the rest of the setup constant. |
| Birds favour the same outside corner instead of the pocket. | Has the wind turned, or is the intended arrival space blocked or unconvincing? | Reopen or reorient the pocket only after rechecking people, boundaries and recovery access. |
| Socks snap, tangle, collapse or pull at their stakes. | Watch the fabric and listen from outside the hide; compare sheltered and exposed groups. | Secure, remove or replace the affected units with steadier decoys. More motion is not automatically better. |
| Identification, a person’s position or recovery access becomes uncertain. | Can the team positively identify birds and account for everyone without guessing? | Stop and resolve the uncertainty. A missed opportunity is preferable to continuing with an unsafe assumption. |
Open the field reference card
- Reconfirm the entry and the stopping conditions
- Observe the field before crossing it
- Draw the pocket before drawing the spread
- Build the hide first
- Build the decoys outward from the intended pocket
- Test the equipment in the real wind
- Brief the team and begin deliberately
- Read the response and make one change
- Recover, cool, count and leave the field clean
Before the next outing
Leave with a record of the wind, the useful approach side and the single adjustment you tested—not only a count of birds or decoys.
Worked example: a good feed, then a turning wind
Two appropriately permitted partners have permission for a harvested field and its agreed access track. They have a portable sock spread. Their first approaches favour one outside corner; the wind has shifted away from the direction used during setup.
Put it into practice
- Pause the hunt, account for both people and the dog if present, and make equipment safe before anyone leaves cover.
- Record the new wind and the repeated approach corner; confirm the alternative pocket remains on permitted ground with a usable recovery route.
- Move only the groups needed to open a new approach pocket. Recheck the hide and everyone’s positions before restarting; keep the calling plan unchanged.
- Observe subsequent approaches and log the result. If safe identification or recovery is now doubtful, finish or move to another expressly approved site.
Common mistakes to avoid
Buying a large spread before checking the logistics
Practice carrying, placing and collecting the equipment with the actual team. A spread you cannot recover before conditions deteriorate is too large for that outing.
Filling every open patch with decoys
A visible flock still needs an inviting arrival area. Keep the intended pocket clear of bags, spare stakes and people, and check it from the likely approach side.
Copying an electronic-caller setup from another jurisdiction
An equipment demonstration does not establish Saskatchewan permission. Verify the current species, season and recording conditions before use; otherwise keep the device off and use a lawful alternative.
Several flocks now favour the same outside corner after the wind turns. What is the best next step?
- Turn up the caller and add motion while a partner moves the decoys.
- Pause safely, check wind and the pocket, change one layout feature and observe again.
- Keep the original diagram because any change makes the spread less realistic.
Show the answer and explanation
Answer: B. Pause safely, check wind and the pocket, change one layout feature and observe again.
A safe pause protects the team while you check the cause. One deliberate change gives the next observation meaning; a diagram cannot overrule the actual wind, permission boundary or recovery conditions.
Five decisions from arrival to return
Work through a complete example, then transfer the equipment and review steps to your own outing.
Watch the narrated field lesson
Original teaching animation with Kokoro synthetic English narration and conceptual diagrams. Credited wildlife photos are representative, not footage of this procedure. English narration · subtitles in four languages
Use the transcript if video playback is unavailable.
Arrive with a workable boundary and return plan
Start at the agreed entrance with the permission record and an offline return route. Match the visible field to the parcel description before unloading. Look for livestock, other visitors, new signs and ground conditions that could change the arrangement. A different entrance or recovery route needs its own confirmation.
Practical actions
- Match the entrance to the exact permitted parcel.
- Keep vehicles on the agreed usable approach.
- Name a turn-back condition and a return contact.
Observe the flock before choosing a pattern
Watch from a lawful observation position. Record where birds are feeding, where they are travelling and what the wind is doing at ground level. Separate a repeated observation from a single pass. A representative flock photograph does not supply a local flight line, current field use or permission to follow birds.
Practical actions
- Record time, light and the features actually visible.
- Sketch observed paths separately from your guesses.
- Check the wind again at the intended working area.
Build a spread you can inspect and retrieve
Keep an open working space rather than a solid wall of decoys. Use positions and orientations you can justify from observation, with an agreed movement and recovery corridor. Check stakes, bags, windsocks or shells in the actual wind before adding more. Calling and motion equipment require their own current-rule checks.
Practical actions
- Set a manageable first version and inspect from outside.
- Check movement, shine, loose material and blocked routes.
- Keep a packing count for complete recovery.
Change one thing and compare
Write down what actually happened before changing the spread. Wind shift, visibility, approach and decoy movement are different possible explanations. Adjust one practical variable, then compare another observation. A single flock that turns away does not establish the cause; enlarging the spread is not automatically the next answer.
Practical actions
- Write the observation before making a change.
- Name the single variable you are changing.
- Recheck access and recovery whenever positions move.
Close the field loop
Return by the agreed route and account for people, equipment, packaging and recovery responsibilities. Keep the identities and current status of harvested birds clear through handling and transport. Record what the outing taught you, including stopping early or making no harvest. The next visit starts with a fresh permission and conditions check.
Practical actions
- Count equipment and remove litter before leaving.
- Link observations and changes to the correct date.
- Create one clear preparation task for the next visit.
Try a different wind direction
Rotate the arrow and compare it with the open working area. The field outline, entry, return route and decoy positions are teaching examples.
Original schematic · check actual ground, permission and recovery
Build your task-based kit
- Confirm the exact parcel, visit date, people and permission conditions.
- Keep the checked entrance, parking and return route available offline.
- Agree a return-time contact and conditions for ending the outing early.
- Check the trip-date weather and current official alerts before leaving.
- Prepare binoculars, a dated observation sheet and a way to check wind at the field.
- Pack task-appropriate clothing, communication, lighting and required documents.
- Match recovery, handling and identification supplies to the planned visit.
- Count equipment, bags and waste materials before leaving the site.
- Test windsocks, shells or other chosen decoys in the actual wind.
- Check support security, shine and loose material before enlarging the spread.
- Keep an open working and recovery corridor inside the permitted area.
- Check current rules for each calling or motion device you intend to use.
Read the visible evidence
Look first. Which visible features support a description, and what remains hidden?
Representative photographs, not observations of your destination. Retain the original source and the uncertainty in each view.
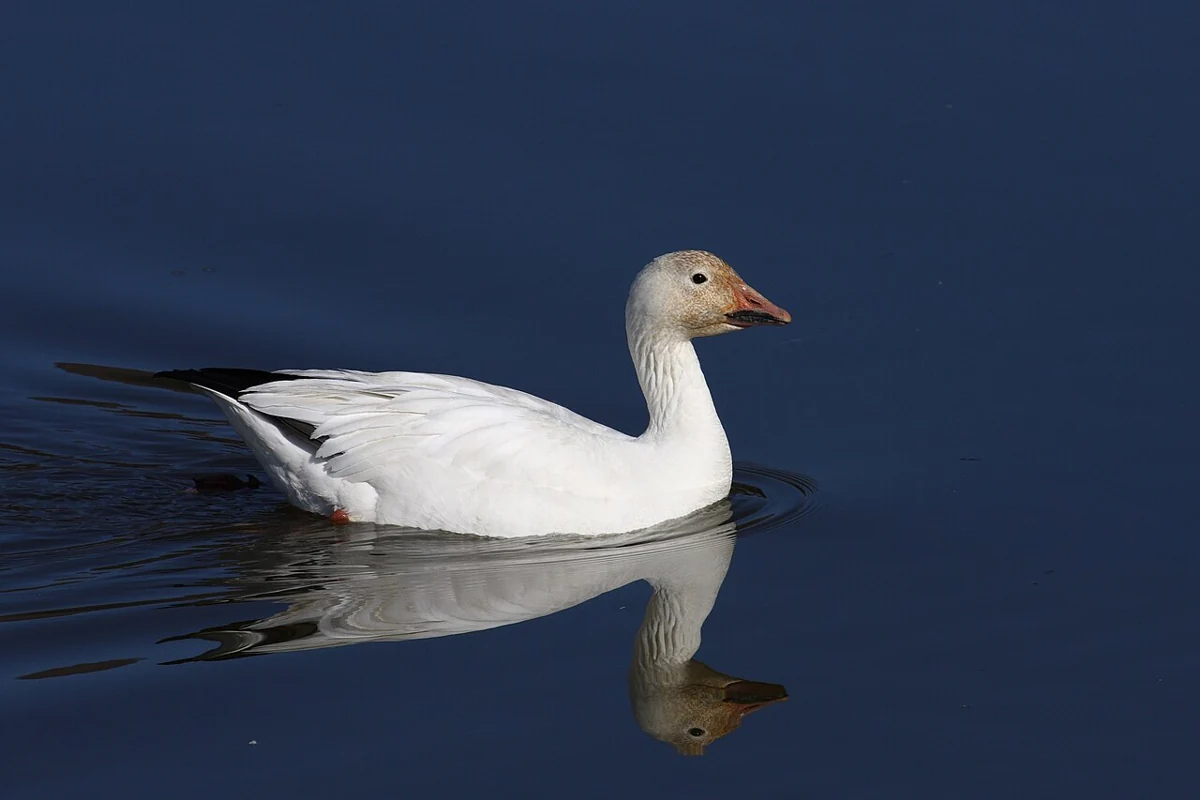
Snow Goose · white morph
Side view on water; the bill and neck remain visible.
Cephas · Photo source and licence · CC BY-SA 3.0
Compare the evidence and its limits
- Trace the longer bill outline and its visible dark edge.
- Compare the neck profile with the Ross’s Goose photograph.
The head is naturally stained. Water hides the legs, and these separate photographs cannot establish relative body size.
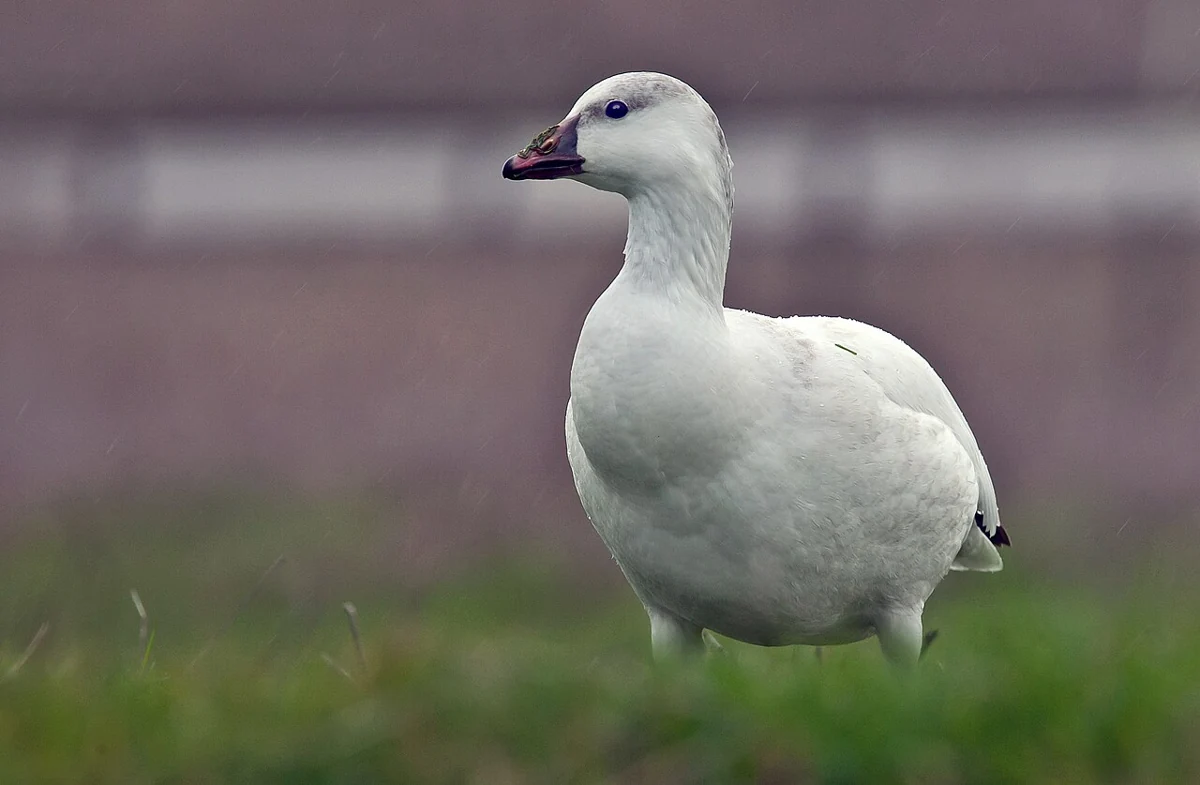
Ross’s Goose · white morph
A compact head and short bill seen from a slight angle.
Mike Baird from Morro Bay, USA · Photo source and licence · CC BY 2.0
Compare the evidence and its limits
- Follow the short bill’s shape rather than relying on white plumage.
- Observe the head-to-neck proportions visible above the foreground.
Grass hides the feet; the bird’s angle differs from the Snow Goose view. One dark bill edge is not a universal test.
Read the complete narration
Arrive with a workable boundary and return plan
Start at the agreed entrance with the permission record and an offline return route. Match the visible field to the parcel description before unloading. Look for livestock, other visitors, new signs and ground conditions that could change the arrangement. A different entrance or recovery route needs its own confirmation.
What would make this entrance unusable today?
Observe the flock before choosing a pattern
Watch from a lawful observation position. Record where birds are feeding, where they are travelling and what the wind is doing at ground level. Separate a repeated observation from a single pass. A representative flock photograph does not supply a local flight line, current field use or permission to follow birds.
Which part of the sketch is observed, and which is inferred?
Build a spread you can inspect and retrieve
Keep an open working space rather than a solid wall of decoys. Use positions and orientations you can justify from observation, with an agreed movement and recovery corridor. Check stakes, bags, windsocks or shells in the actual wind before adding more. Calling and motion equipment require their own current-rule checks.
Can the group work and retrieve everything inside the agreed area?
Change one thing and compare
Write down what actually happened before changing the spread. Wind shift, visibility, approach and decoy movement are different possible explanations. Adjust one practical variable, then compare another observation. A single flock that turns away does not establish the cause; enlarging the spread is not automatically the next answer.
What evidence would show that the change helped?
Close the field loop
Return by the agreed route and account for people, equipment, packaging and recovery responsibilities. Keep the identities and current status of harvested birds clear through handling and transport. Record what the outing taught you, including stopping early or making no harvest. The next visit starts with a fresh permission and conditions check.
What will you change next time, and why?
Record one observation, one change and one next task.
Snow Goose: an unknown count, a counted view and a zero
A fictional observer revisits one marked viewing sector. The record keeps identification, count and unobserved ground separate.
Fictional teaching example, not a parcel sighting or current conditions report. Example times are not hunting-hour guidance.
Scroll across the table to compare each observation with its interpretation and next check.
| Time | Direct observation | Count and scope | Interpretation / uncertainty | Next check |
|---|---|---|---|---|
| Birds cross the viewing sector, but overlap and distance prevent a reliable count. | Unknown Birds crossing this sector; identification unconfirmed. | The movement is observed. A Snow Goose identification and a numerical count are still unconfirmed. | Keep the count unknown and seek a clearer view from the checked observation position. | |
| Three birds identified as Snow Goose are visible together in one clear view. | 3Observed count Three Snow Goose in this single view. | This is a count for one view, not an estimate of birds hidden elsewhere or a population total. | Record the viewing sector and time; leave the ground outside that view unobserved. | |
| No birds are visible during a later five-minute check of the same sector. | 0Zero in this sample Zero birds observed in that checked sample. | A zero in this sample does not establish that the whole field is empty. | Keep the zero with its observation interval rather than carrying the earlier count forward. |
Counts belong to the stated view or sample. Repeated views may include the same animals; these rows are not summed into a unique population total.
A concrete next action
Keep all three rows. Select the next small observation question from the missing evidence, not from a summed total.
Pause and reflect
Which row has a valid zero, and why is the first row not another zero?
Read the reasoning
The last row records a checked view with no birds observed. The first row contains birds but no reliable count, so its count remains unknown. Neither row describes all birds in the area.
Terms on this page
Open a term for its meaning, a common mix-up and the existing guide. English terms and acronyms are retained.
unknown count
A record for which no reliable numerical animal count was obtained.
Common mix-up: Unknown is not zero. Uncertain species identity does not by itself erase a number actually seen.
zero count
No animals observed in the defined view or sample that was actually checked.
Common mix-up: Do not extend that zero to uninspected ground or to a whole population.
sample coverage
The view or ground, and observation interval, that were actually checked for a particular record.
Common mix-up: Hidden or uninspected ground lies outside that checked sample, even when it is nearby.
direct observation
What was actually seen, heard or measured, with the view and context recorded.
Common mix-up: A sound can be observed without confirming an animal’s identity or number.
Current checks and official context
Scope and final eligibility check
These intermediate lessons assume permission and preparation are complete and cover dry, harvested fields, not boats, ice or wetland access. Layouts and example equipment quantities are planning advice, not legal requirements or guaranteed results. The legal context was checked on November 1, 2026 for 2026–27; verify the rules again for your date, place and licence category.
Carry the applicable Saskatchewan game bird licence, Wildlife Habitat Certificate and federal MGBH Permit with its conservation stamp. People actively placing decoys, calling or retrieving also need an MGBH Permit; an observer is not automatically an authorised helper.
Calls, grain and non-toxic shot
Canada Goose lessons use mouth calls. Saskatchewan permits Snow Goose and Ross’s Goose recordings under the specified white-goose measures. In autumn, while actually hunting those geese with authorised recordings, other migratory species may be hunted only in their own open season. Spring white-goose measures do not open a Canada Goose season.
Use and possess only non-toxic shot during this waterfowl hunt. Never scatter feed or imitation feed to improve a spread. Normal harvest residue differs from bait; resolve suspected baiting and its restrictions before setting up.
Recovery and a clean departure
Have adequate recovery means immediately available, retrieve promptly and arrange access beyond the parcel beforehand. Do not use motor vehicles to pursue or hunt birds. Keep a fully feathered wing or head attached to unpreserved birds for identification; check tagging rules before another person transports them.
Wear gloves when handling birds, clean hands and equipment, and cool the harvest promptly. Keep dogs away from obviously sick birds or birds already found dead. Follow the linked handling guidance.
Pocket lesson card
Public teaching summary for review and offline reading. It contains no actual trip records, permissions, parcel conditions or coordinates. Use the full lesson and current official guidance for your own plan.
Save the HTML for offline text. Use your browser’s Print menu to print the opened card; online links require a connection.
Read the pocket card
Snow Goose · field preparation
Before leaving
- Prepare a manageable first set; inspect supports and loose material.
- Keep entry, return and recovery ground on the checked map.
At the location
- Record the actual wind and one clear viewing sector.
- Leave the working and recovery space open inside the permitted setup.
Return
- Close the return check-in and collect equipment and waste.
- Use the reviewed bird-care and identification guidance when packing.
Review
- Choose one missing piece of evidence to check next time.
- Keep unknown counts distinct from zeros in checked views.
A fictional observation example
Fictional example: one view contains three birds, a later checked view contains zero, and another count is unknown. Retain each view and its scope separately.
Full reviewed lesson · onlineSource lesson editorial review: 2026-11-01
Turn this lesson into your next outing
Review the date, species, starting template and linked day plan in an editable preparation draft. You choose what to add and save.
Prepare your own trip
Review a preparation draftContinue learning
Snow Goose or Ross’s Goose: practise an evidence-based identificationTry a practical situation
A smaller goose, or a more distant goose?Opening a draft does not create a saved checklist. A checked item records your own review, not permission or an open season.
Scenario practice
Put your field decisions into practice.
Try 24 situations across identification, access, field adjustments and harvest care. Compare your choice with the explanation, then revisit the relevant lesson.
Original sources
- Government of Saskatchewan · Waterfowl licences and habitat certificate
- Environment and Climate Change Canada · Saskatchewan 2026–27 migratory birds summary
- Environment and Climate Change Canada · Migratory game bird hunting FAQ
- Government of Canada · Migratory Birds Regulations, 2022
- Government of Saskatchewan · Avian influenza and handling wild birds
- Ducks Unlimited · Small-Spread Snows
- Ducks Unlimited · Classic Spreads
- Ducks Unlimited · Five Great Spreads for Geese
- Ducks Unlimited · 10 Surefire Decoy Strategies
- Iowa DNR · Geese: behaviour and equipment
- Texas Parks & Wildlife · Hunter education: Decoys
- Nebraskaland · A Snow Goose Primer
Use this as a planning guide. Check current official requirements and site conditions before travelling.
Help improve this guide
Tell the editor about something on this public page that needs attention.